Occasionally, you will see two-view drawings,
particularly cylindrical objects. The most common
three-view drawing arrangement shows the front, top,
and right side view of an object.
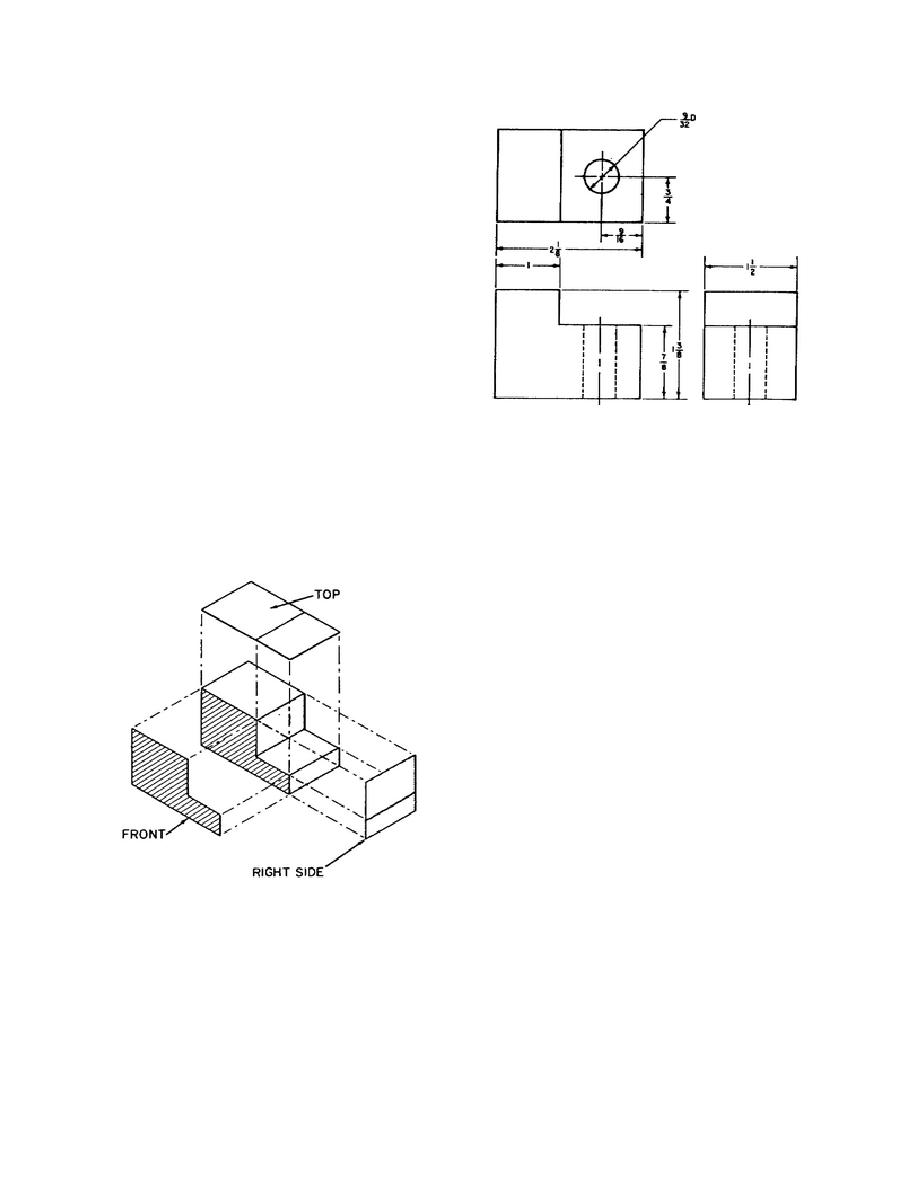
(4) In a three-view drawing, the front view
shows the most characteristic feature of the object.
Note in figure 1-8 that the right side or end view is
projected to the right of the front. Also notice that all
the horizontal outlines of the front view are extended
horizontally to make up the side view and all the
vertical outlines of the front view are extended
vertically to make up the top view. By studying the
drawing you should obtain the following information
about the object: the shape of the object, its overall
length (2 1/8 inches), its width (1 1/2 inches), and its
height (1 3/8 inches). It is notched 1 1/8 inches from
the right side and 7/8 inch from the bottom. After
having studied each view of the object, you should be
Figure 1-10. Hidden lines in a three-view drawing.
able to visualize the object as it appears in figure 1-9.
If a hole is drilled in the notched portion of the
b. Pictorial Drawings. It is easier to visualize
object, the drawing would appear as in figure 1-10.
an object if its features can be shown in a single
The position of the hole is indicated by hidden lines
view. Where it is necessary for the drawing to show
in the front and side views and as a circle in the top
the appearance of an object with more than one side
view. The location of the center of the drilled hole is
visible in a single view, pictorial drawings are used.
indicated by a center line.
Three types of pictorial drawings may be
encountered: projections, oblique drawings, and
perspective drawings.
(1) Projections. The principle of pictorial
projections is the same as orthographic projection,
but the object is rotated and tilted so that more than
one face is projected on the drawing plane as shown
in figure 1-11. Since the faces of the object are not
parallel to the drawing plane, lines are foreshortened
and do not appear in true length. If each object plane
forms a different angle with the drawing plane, the
amount of foreshortening is different along the axis
of the drawing. This is called a trimetric projection
(fig 1-11) and three different scales must be used. If
the object is rotated so that two planes form the same
angle with the drawing plane, the amount of
foreshortening will be the same along two axes. This
is called a dimetric projection (fig 1-11) since only
two scales are used. If the object is tilted so that all
three planes form the same angle with drawing plane,
Figure 1-9. Interpretation of three-view drawing
the scale will be the same
11


 Previous Page
